Introduction
I’m going to acknowledge the fact that I do not need this upgrade. At the time of writing this article, my desktop is the only device on my network with faster than 1 Gigabit - which is still only 2.5 Gigabit. But my ISP offered 3 Gigabit for only $5 more than my current 1.5 Gigabit plan. So why 10 Gigabit? Cost. After researching 2.5 gigabit equipment, I found that 10 Gigabit was often the same price or cheaper. So I decided to go for it.
Table of Contents
Open Table of Contents
Hardware
ISP Modem
I’m going to start with the ISP-provided modem/router combo. Unfortunately, it is impossible to completely bypass it, but with PPPoE you can get a public IP address on your router. My ISP is Bell, and they provide a Gigahub - a newer version of their Home Hub 4000. It has one 10 gigabit ethernet port and 4 gigabit ports. I will be using the 10 gigabit port to connect to my router.
For the sake of this article, I will refer to this modem/router combo as the “modem.”
Router
Before upgrading my network, I used a Lenovo ThinkCentre M73 SFF with an i5-4570. Plenty fast for gigabit, though PPPoE does have some overhead. Unfortunately, I didn’t test the 3 Gigabit connection with it before the change, but I was confident it would have no issue with it.
I ended up purchasing a used Thinkcentre Tiny M720q with an 8600T. I’ve already got one of these with an 8700T running Proxmox and the rest of my home lab - so the platform was familiar, and I knew I could add a network card to it. The intention of the upgrade was to future-proof while also improving power usage and form factor. The typical TDP is going from 84W to 35W, and I’m getting 2 more cores. The size is also much smaller, which is excellent for my small-ish living area - from 12 litres down to 1 litre.
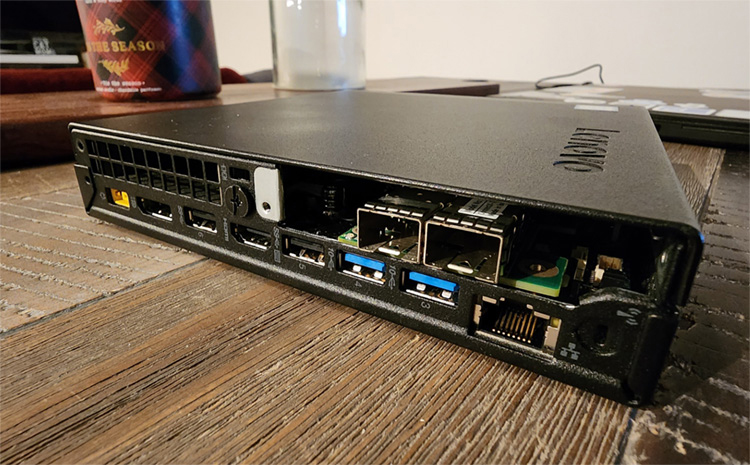
Network Card
I went with a cheap ConnectX-3 Pro SFP+ card from eBay. At CAD ~30, shipping from China was the cheapest option for anything faster than 1 gigabit. It took about a month to arrive, but it was worth waiting for. Since it’s SFP+ - I knew I’d need an RJ45 transceiver to connect it to the Gigahub.
Switch
I debated going for a used switch, but the only affordable options I could find were the large rack-mounted switches. I opted to go for the Mikrotik CSS610-8G-2S+IN. After some quick research, this was the cheapest option with my required features. I was able to source this from a local seller for about CAD ~200 all in. It’s a managed 10 gigabit switch with 8 Gigabit ports and 2 SFP+ ports.
Transceivers
Finally, I’d need some transceivers to connect everything. I needed two ethernet transceivers and one DAC cable. Thanks to Serve the Home’s article on SFP+ to 10Gbase-T Adapters, Plenty of these 10 gigabit transceivers are actuylly multi-gigabit. I initially purchased two 10Gtek ASF-10G-T. As well as one of their DAC cables. Everything worked great except for the 2.5G connection to my desktop - I was not getting the entire throughput. Upon researching, I stumbled upon one of Jeff Geerling’s articles regarding these multi-gig ethernet transceivers.
I kept one of the 10GTek transceivers for the connection between my modem and router, as that was having no issues. Still, I went with a Wiitek SFP-10G-T to connect to my desktop and got around 2 Gigabit download and 2.5 Gigabit upload. Not quite all the way there, but close enough for my use case.
Software
This section will be light as the only software needed was OPNsense. SwOS is included with the CSS-610 switch.
OPNsense
I initially used pfSense on the M73 but switched to OPNsense because they are basically the same. I like to go open source when I can, especially when there’s no friction in changing. Considering that I was already going to be re-doing my configuration, there was no reason to stick with pfSense.
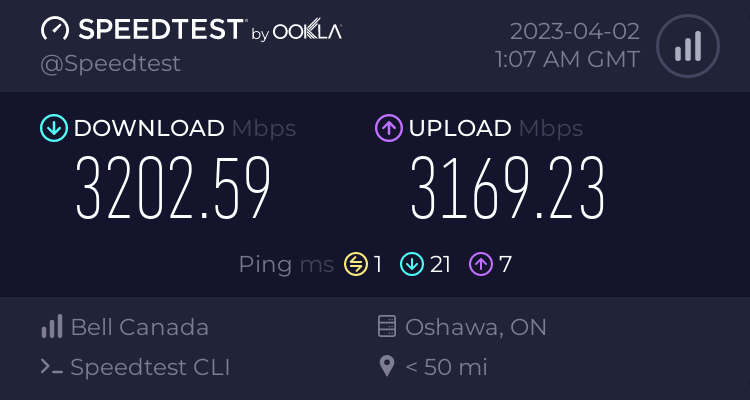
I downloaded the DVD image from the OPNsense download page and put it on my USB drive that is running Ventoy, then booted from it. The setup was simple. Anyone familiar with pfSense would have no issue setting up OPNsense. While I couldn’t test the full 10 Gigabit through WAN, I could pull the full 3 Gigabit on speedtest.net using their CLI.
There was one thing I did have to configure in OPNsense to get the SFP card to work. I had to set mlx4en_load to yes in SYSTEM:SETTINGS:TUNABLES to load it at boot. Other than that, everything worked out of the box.
All of that just for a bigger number! I’m happy with the upgrade, and learned a few things in the process.